As an all-in-one solution, UltFone Toolkit is dedicated to help you solve any issue, from ios system breakdowns, activation lock bypass and screen unlock, to WhatsApp data transfer, GPS location change and much more. Follow this guide to learn how to realise funtions above.
Part 1: Guide for UltFone Toolkit - iOS Screen Unlock
UltFone iOS Screen Unlock can unlock any iOS device in a matter of minutes, regardless of whether it has a 4-digit, 6-digit, custom numeric, or alphanumeric passcode, Touch ID, or Face ID information. All iPads as well as the most recent iOS 16 and iPhone 14 are supported. The article will show you how to unlock iPhone screen with UltFone iOS Screen Unlock step by step.
- 1.1 Unlock iPhone Passcode
- 1.2 Remove Apple ID without Password
- 1.3 Bypass MDM Lock Screen
- 1.4 Remove Screen Time Passcode
1.1 Unlock iPhone Passcode
Step 1: Download and Install UltFone iOS Screen Unlock
Download and install UltFone iOS Screen Unlock on your PC or Mac, launch the program and click "Start" to begin unlocking lock screen passcode.
Step 2: Connect iPhone to Computer
Connect your iPhone to your computer and the software will detect it automatically. Click "Next" from the main interface.
If your device can't be detected, please follow below steps to put your device into "Recovery Mode" or "DFU Mode" to get it detected.
Guide on how to get into "DFU Mode":
Step 3: Download Firmware Package
Now you’ll be asked to download the latest firmware package. Choose a save path and click "Download" to proceed.
- Note: Please make sure that your computer has at least 7G space to download the firmware package.
Step 4: Start Unlocking iPhone Locked Scree
When the firmware is downloaded to computer, please click "Start Remove" to start removing iPhone passcode.
The whole process will take several minutes. Please keep the device connected during the process of password removing.
Step 5: Reset Passcode
After successfully removing the iPhone passcode, you can reset the passcode, Touch ID, and Face ID settings on your iPhone. Also, you can restore your iPhone from a previous iTunes or iCloud backup.
1.2 Remove Apple ID without Password
Step 1: Launch UltFone iOS Screen Unlock
Download UltFone iOS Screen Unlock on your PC or Mac, then open the program to start. You will see the following interface, choose the function "Unlock Apple ID".
Connect your iOS device to the computer. UltFone iOS Screen Unlock will remind you to unlock the screen first, and tap the "Trust" on your device.
Step 2. Remove Apple ID
Click "Next" button to remove the Apple ID and iCloud account presently associated to your iPhone, iPad or iPod touch.
- Scenario 1: If Find My iPhone is off (All iOS versions are supported
- Scenario 2: If Find My iPhone is on and iOS version is below iOS 11.4
- Scenario 3: If Find My iPhone is on and iOS version is iOS 11.4 or later
Scenario 1: If Find My iPhone is off (All iOS versions are supported)
UltFone iOS Screen Unlock will unlock your Apple ID immediately after it is detected and your data will not be lost. (All devices are supported)
The whole process will take a few seconds till the following interface appears.
Scenario 2: If Find My iPhone is on and iOS version is below iOS 11.4
In such situation, you should reset all settings on your iOS device first. Here is how to do: go to "Settings > General > Reset All Settings". After you reset all settings, your device will automatically restart. And UltFone iOS Screen Unlock will start removing your Apple ID or iCloud account immediately.
When the Apple ID unlocking process is complete, you can login into a different Apple ID or create a new account.
Scenario 3: If Find My iPhone is on and iOS version is iOS 11.4 or later
To remove Apple ID from the device running iOS 11.4 or later, you need to make sure that you have set up the screen lock passcode and enabled the Two-Factor Authentication. Otherwise, you will be prompted that the device is not supported.
- Step 1. Setup Screen Lock Passcode on iOS device
- Step 2. Turn on Two-Factor Authentication
- Step 3. Download The Firmware Package
- Step 4. Start to Unlock Apple ID
- Step 5. Activate Your Device
Step 1. Setup Screen Lock Passcode on iOS device
To set up a passcode on your iPhone, go to Settings > Face ID & Passcode/Touch ID & Passcode/Passcode, and Tap ‘Turn Passcode On’. Then, click the ’Yes’ button on the UltFone iOS Screen Unlock.
Step 2. Turn on Two-Factor Authentication
Next, confirm to tap "Yes" button on the interface if you have enabled Two-Factor Authentication already.
Step 3. Download The Firmware Package
The software will automatically identify your device’s iOS version and give the appropriate firmware package. By pressing the button, the firmware can be downloaded.
To download and check the firmware package, wait a short while.
Step 4. Start to Unlock Apple ID
To delete Apple ID, click "Start Unlock" after the download is finished. Please don’t unplug your device at any point during the procedure.
Your smartphone will instantly enter recovery mode, and the screen will show a progress meter.
Step 5. Activate Your Device
After successfully erasing the Apple ID, your device will restart. When the Activation lock screen opens, click "Unlock with Password," then choose "Use Device Passcode" and input your screen passcode.
Done! Your iOS device’s Apple ID has been successfully deleted!
1.3 Bypass MDM Lock Screen
Step 1: Launch UltFone iOS Screen Unlock
When the download is complete, launch this program on your computer and click to select the "Bypass MDM" mode.
Step 2: Connect Your iDevice to Computer
Connect your iPhone/iPad/iPod Touch to your computer using a USB cable.
Once the connection is successful, click the "Start” button to proceed. (Find My iPhone needs to be turned off before the bypassing process.)
Step 3: Bypass MDM
Now, it will start bypassing the Remote Management lock. Please keep your device connected during the process.
In just a few seconds, the MDM lock screen on your device will be removed successfully.
- Note:
- The Mobile Device Management will appear again after factory restore or software update before signing out of Apple ID. You can use the UltFone iOS Screen Unlock to bypass the MDM lock again before the license expires.
1.4 Remove Screen Time Passcode
Step 1: Download and Launch UltFone iOS Screen Unlock
First, download and install UltFone iOS Screen Unlock on your computer. Launch the program and select Remove Screen Time Passcode at the main interface.
Step 2: Connect Your Device
Connect your iPhone/iPad/iPod to the computer with a USB cable. Please make sure that your device has been activated.
If you have not trusted the computer yet, please unlock your device and tap on Trust on the pop-up message.
After successfully connecting your device, click on Start Remove to proceed.
Step 3: Turn off Find My iPhone
You should turn off Find my iPhone in order to erase the screen time passcode. Therefore, if you have enabled Find My iPhone, please follow the on-screen instructions to disable it.
Step 4: Remove Screen Time Passcode
Once you have turned off Find My iPhone, the program will start removing the screen time passcode immediately, please wait for a few seconds.
Your device will restart after the screen time passcode has been successfully erased. Please choose Don’t Transfer Apps & Data during device setup to prevent data loss. Selecting Set Up Later in the Settings window when configuring Screen Time.
Done! The screen time passcode has now been successfully eliminated without any data loss.
Part 2: Guide for UltFone Toolkit - Android Screen Unlock
As a professional Android lock screen removal tool, UltFone Android Unlock can quickly remove all types of Android lock screens, including screen pin, pattern, passcode, and fingerprint.And it also can help you remove Google lock (FRP) from Samsung devices
2.1 Remove Android Lock Screen without Password
UltFone Android Unlock enables you to access your Android device again without any passcode. To get started, please download and install UltFone Android Unlocker on your computer first.
Step 1: Launch UltFone Android Unlock
Launch the program, choose feature "Remove Screen Lock" and connect your device to the computer with a USB cable. The program will install the driver for your device when you run it.
Step 2: Remove the Screen Lock
- Scenario 1: Unlock Early Samsung Devices Without Data Loss
- Scenario 2: Unlock Most Android Devices With Data Loss
Scenario 1: Unlock Early Samsung Devices Without Data Loss
1. For some earlier Samsung devices, UltFone Android Unlock supports removing their screen lock without losing data on Windows. Choose Remove Screen Lock without Data Loss option, and then click Start to begin.
2. Next, select the correct device name and model according to your phone. If you do not know the information, click on “Don’t know the device model?” below to check how to get. And if your Samsung device is not in the list, then you have to try another mode to unlock it.
3. Please confirm the device information you select is correct.
4. Then it will automatically download the data package. After it finishes, click Next to continue.
5. You should then put your Samsung phone into download mode by following the on-screen steps. Click on Start when it successfully gets into download mode.
6. The program will start to remove the screen lock. Wait a few minutes for it to finish. Then you can unlock your phone without password successfully.
Scenario 2: Unlock Most Android Devices With Data Loss
1. For other Samsung and Android devices, choose Remove Screen Lock option. The software will automatically identify the brand of your device. If it shows incorrect device brand, click “Is your phone not from this brand?” to select the device brand that needs to remove the Screen Lock and then click Start to begin.
2. Then you must confirm that "Removing the lock screen password will erase all data on the device". If you are sure, just click button "Yes", then UltFone Android Unlock will start to remove lock screen automatically.
- Note: If you are using a Samusung device, the removing process will be completed successfully here, you don't need to follow the instructions below.
3. Once the removing process is done, you will be asked to enter recovery mode and perform a factory reset on the Android phone.
4. At last, UltFone Android Unlock will automatically remove the lock screen. A few minutes later, you will see the whole process completely.
2.2 Remove Google Lock (FRP) from Samsung Devices
If you purchase a locked used Samsung device and don't have the password or if you just lost your Google password. Whatever the reason, UltFone Android Unlock can assist you in 5 minutes in removing Samsung FRP on both Windows and Mac. Support Android 6/7/8/9/10/11/12/13 on Samsung.
Step 1: Connect Samsung Device
After installing UltFone Android Unlock on your computer, connect your locked Samsung device, then choose the feature "Remove Google Lock(FRP)".
Step 2: Select Device OS Version
Now, you will jump to a new screen. Please select the OS version of your Samsung device and click "Start". If you don't know, click on the "Don't know the device OS version?" option to check.
Step 3: Remove Samsung FRP Lock
To continue, you need to check the on-screen notes and confirm. Then click on "Start". As there is a little difference in the next steps according to the device OS version you selected, so just choose your Samsung version and go on.
1. For Android 11/12/13
1. Click the "Start" button when a confirmation popup appears.
2. On your Samsung device, go back to the very first Welcome Screen. Tap "Emergency call" to bring up a dial pad from where you need to enter #0#. Then your device will immediately enter its hidden diagnostic mode.
3. Now, click the "Next" button on the bottom right corner of the program window. UltFone Android Screen Unlock for Android will start removing the FRP lock from your device.
4. It may take a few minutes for the Samsung FRP bypass process to complete. When the Google FRP lock is successfully removed, a success message will be shown on the screen and your Samsung device will reboot immediately.
5. Once your phone restarts, you won't be asked to verify your Google account and you can just follow the onscreen instructions to set up your phone as new.
Alternative Method:
In case the above method doesn't work on your device for some reasons or there isn't a dial pad on your Samsung tablet, we suggest trying the alternative method.
- 1. Go back to the OS version selection page, choose "Android 11/12/13" and click "Start" to proceed.
- 2. Now, click "Alternative method" directly from the Notes.
- 3. On the pop-up window, click "Start" when you confirm that your device has been connected to a Wi-Fi network and it is now on the Google account verification page.
- 4. UltFone Android Unlock will send a notification to the locked Samsung phone that has been connected to the PC.
- 5. Tap the "View" button on your Samsung device to open Samsung Galaxy Store.
- 6. Follow the on-screen instructions to go to Galaxy Store and download the "Alliance Shield" app.
- Note: For the application you downloaded, the usage is in line with their terms, and if there is a violation of your rights, please contact us.
- 7. Open Alliance Shield and go to the login page. You need to register a new account for this app. After sign in, enter the device model and tap on Next.
- 8. Follow the steps to turn on "Device admin" and "Knox". Then go to App Manager and search for "service mode".
- 9. Turn on Service mode and check "MTP+ADB". It is important to check this option and allow USB debugging on your phone. Then unplug and replug the USB cable to your Samsung device.
- 10. Next, UltFone Android Unlock will start removing the Google lock, please wait for it to finish.
- 11. The last step: after the program removes the lock, you can enter the home screen on Samsung. Go to Settings > General management > Reset, and factory reset your device to completely bypass the FRP.
- Note: If your Samsung device is not secured by Knox, the alternative method may not work for you. Please click the button below to check the list of Samsung devices which support Knox.
2.For Android 6/9/10
- 1. After you confirm the information and click on Start, Ultfone Android Unlock will send a notification to your Samsung phone.
- 2. Click "View" option on your Samsung device, and your phone will go to Galaxy Store. Open Samsung Browser here. If your Samsung Browser app needs updating, update first.
- 3. Click ">" icon to continue. Then, tap on "Open Settings" and you will jump to the Settings page. Choose "Pin" option on your phone.
- 4. Then select Do not require and set a pin code in the next page. When the page in step 9 shows, skip it and tap on "Back" button to go back to the Wifi page.
- 5. Go on the final 3 steps. Reconnect Wifi and continue the settings. In the Pin page, enter the pin code just set. Then you can skip or sign in Google account and finish settings. After these, click "Next".
3. For Android 7/8
- 1. Ultfone Android Unlock will send a notification to your Samsung device. Please don't disconnect your phone during the process.
- 2. Click on "View" on your Samsung phone. Without go to Samsung Galaxy Store, your phone will directly jump to Browser and the next steps are the same. Then, tap on "Open Settings".
- 3. Select "Pin" option on the "Protect your phone" page. Set up a pin code you remember.
- 4.In the page of step 7, choose Skip and tap on "Back" or "<" to return to Wifi connection page. Reconnect the Wifi and enter Pin code next. Similarily, skip or log into your Google account.
Step 4: Restart Samsung Device
Last, your device will restart. If it needs a Pin code, use the pin code you just set to access your Samsung device.
Part 3: Guide for UltFone Toolkit - iOS System Repair
UltFone Toolkit - iOS System Repair is a professional iOS system recovery tool that contains three major features: Enter & Exit Recovery Mode, Reset Device and Repair Operating System. With UltFone iOS system repair tool, you can put any iPhone/iPad/iPod touch into or out of recovery mode with only one click. And if your iDevice gets stuck in recovery mode or stuck on Apple logo/reboot loop/black screen, it'll empower you to fix not only these but also other 150+ iOS system issues/errors/stuck without any data loss.
Follow this guide to learn how to exit/exit recovery mode and repair iOS system.
- 3.1 Enter/Exit Recovery Mode
- 3.2 How to Repair iOS System without Data Loss
- 3.3 Reset iPhone/iPad/iPod
- 3.4 Downgrade iOS/iPadOS
- 3.5 Fix macOS system
- 3.6 Downgrade macOS
- 3.7 Upgrade macOS
3.1 Enter/Exit Recovery Mode
1-Click to Enter Recovery Mode
Need to put your iPhone/iPad/iPod in recovery mode but have no idea about how to implement it? Can't enter/exit recovery mode because the Home or Power button in your iDevice is broken? Here UltFone iOS System Repair comes to empower you to enter or exit iOS recovery mode by only one click with no need to press any buttons.
iPhone/iPad/iPod recovery mode, which presents a Connect to iTunes message on the screen, is a situtaion that can happen during/after an iOS update/jailbreak. Let's see how to put an iDevice in recovery mode with iOS System Repair free.
Step 1: Upon downloading and installing iOS System Repair on your PC/Mac, please launch the program and connect your iPhone/iPad/iPod touch to computer with a lightning cable.

Select Enter Recovery Mode option from the main interface.

Step 2: Click on the Enter button to put your iPhone, iPad or iPod touch in recovery mode. After a 10-sec wait, you will see your device display the classic USB to iTunes logo. Congratulations! Your device has entered the recovery mode successfully.

Video Guide on How to Put iPhone In Recovery Mode Free
1-Click to Exit Recovery Mode
iPhone gets stuck in recovery mode after updating to a new firmware or when you are trying to restore a backup? UltFone iOS System Repair allows you to fix iPhone/iPad/iPod touch stuck in recovery mode with only 1-click.
Step 1: Connect your iPhone/iPad/iPod touch to computer, and launch iOS System Repair. Select the Exit Recovery Mode feature from the main interface.

Step 2: Click on the Exit button and wait for 10 seconds or so.

Step 3: After a while, your iPhone/iPad/iPod will reboot and get out of recovery mode successfully.

Video Guide to Fix iPhone Stuck in Recovery Mode
3.2 How to Repair iOS System without Data Loss
Let's now move on to the iOS System Repair module. This module turns you into a pro user as you can efficiently and effortlessly resolve almost any of the iOS firmware related issues of iDevices, such as iPhone stuck in recovery mode/DFU mode during an iOS update/jailbreak, iPhone won't turn on or charge, iPhone screen unresponsive after update, etc. You can fix most of these iOS problems after a factory reset or tedious iTunes restore, whereas, by doing so, you have to bear losing all files in your device and the procedures can be super complicated for beginners.
Now with UltFone iOS 16/15/14 System Repair, you can easily repair these iOS system issues without data loss in only a few clicks. Let's learn how it works right now!
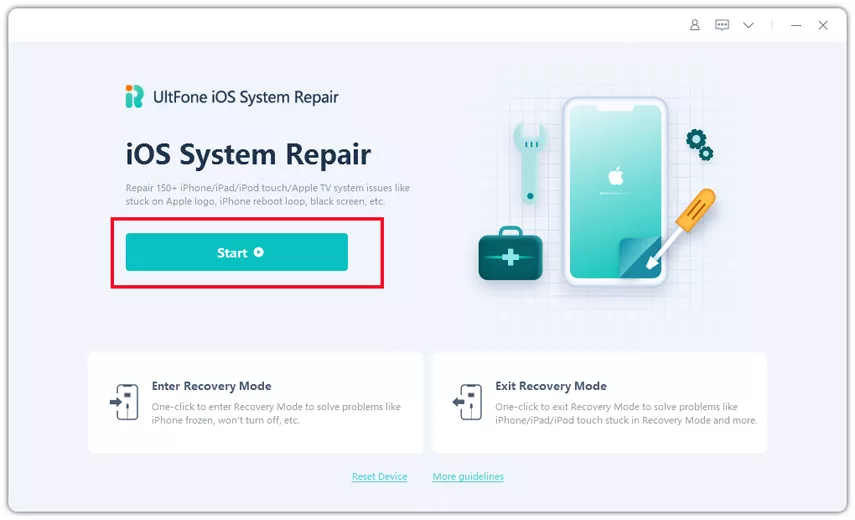
Step 1: Download and Launch UltFone iOS System Repair
Download and launch this program on your PC/Mac, then connect your iPhone/iPad/iPod touch to the computer. Click "Start" to enter the iOS system repair module.
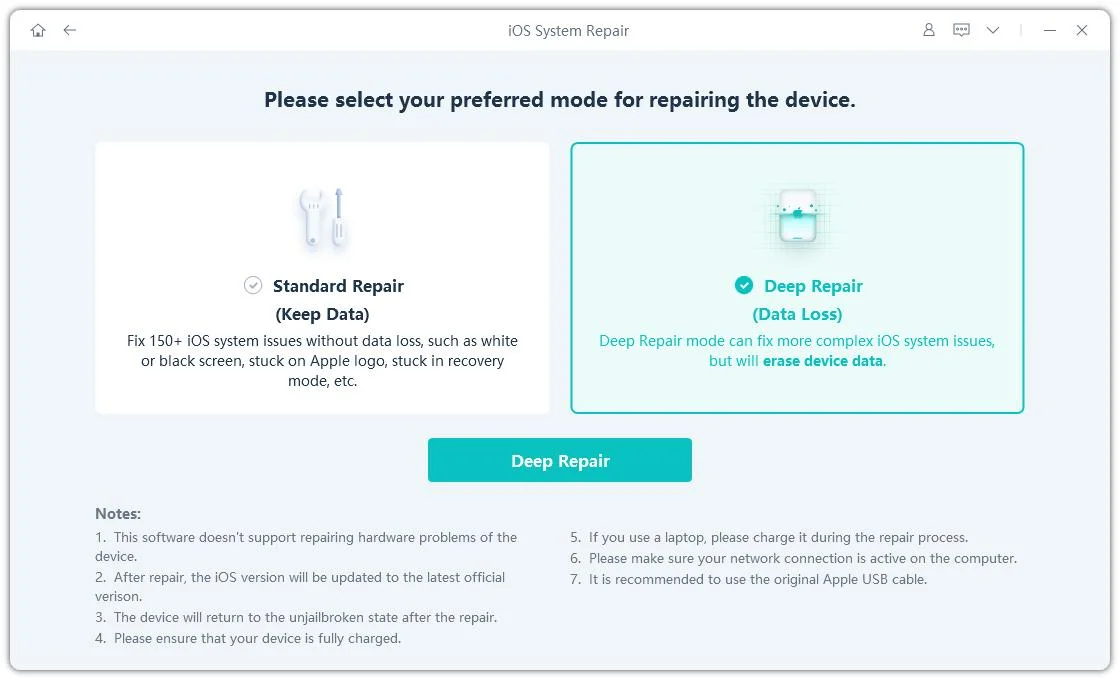
Step 2: Select Standard Repair
On the following screen, click "Standard Repair" to proceed.

Notes:
1. If your iDevice can't be detected, this program will guide you to put your device in recovery mode or DFU mode manually to get it detected.


2. As we can see on the interface that there're two repair modes available: Standard Repair and Deep Repair. The only difference between them is that with the Standard Repair, the iOS issues can be resolved without any data loss. On the other hand, the Deep Repair mode will wipe off everything on your device and help you to resolve more serious iOS issues that were just not fixed by the Standard Repair option. If the Standard Repair mode doesn't fix your problem, or you'd like to factory reset iPhone/iPad without password, please choose the Deep Repair mode.
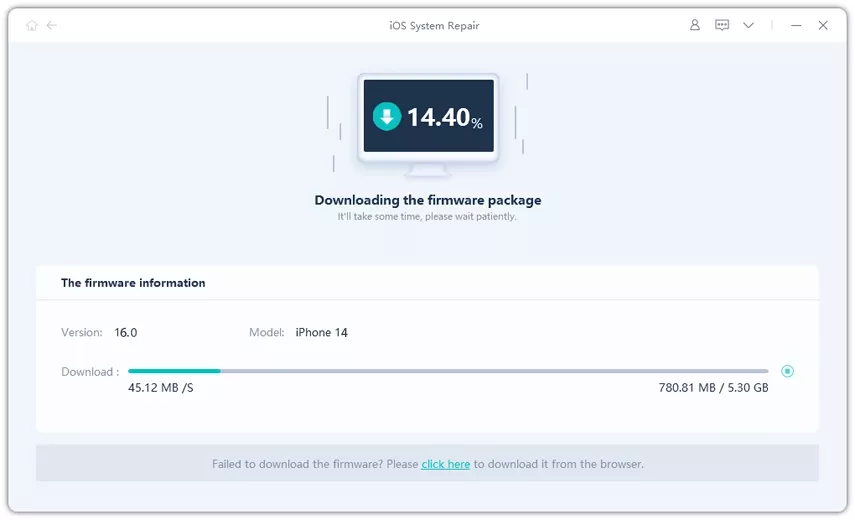
Step 3: Download Firmware Package
Before performing the system repair, you need to click the "Download" button to download the automatically matched firmware package for your device. You can change the saved path by clicking "Browse" to select another location to store firmware package.

Notes:
If you have already downloaded the firmware before, please click "import local firmware" to import your firmware package.

The firmware package is about 2.5 GB, so please wait patiently and keep the Internet environment around you good.
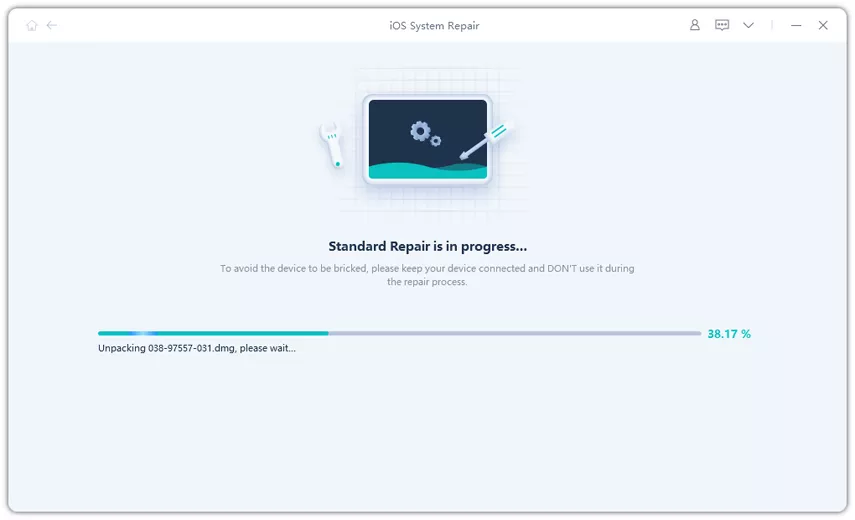
Step 4: Start Repairing Operating System
After the firmware package is downloaded successfully, please click "Start Standard Repair" to fix the iOS issues on your device.

Wait for a few minutes to repair iOS system.
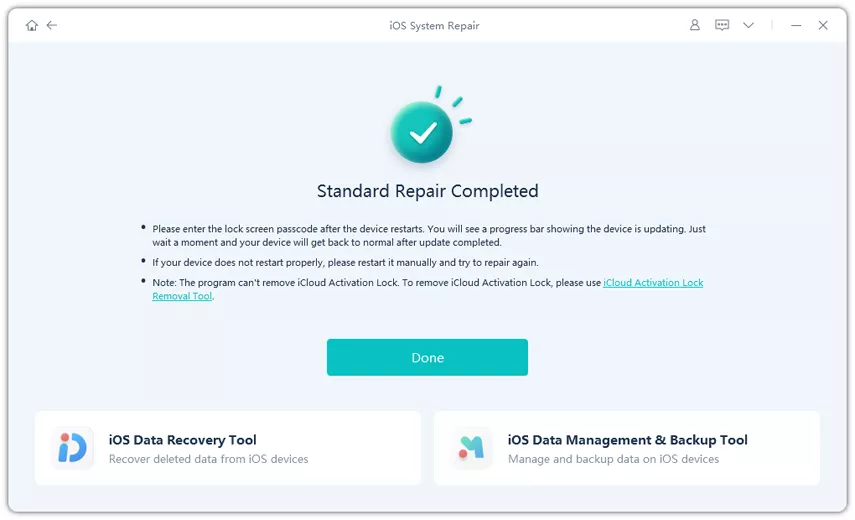
Step 5: Done with the iOS System Repair
When the iOS system recovery is done, your iOS device will automatically reboot and everything will get back to normal.
3.3 Reset iPhone/iPad/iPod
Factory Reset iPhone/iPad/iPod without Password
Your iPhone is diabled and cannot turn on anymore? Or you want to restore iPhone but iTunes failed to do that? No worries, with the "Factory Reset" function on UltFone iOS System Repair, you can directly reset iPhone to factory settings without using iTunes or iCloud. Here's how to do it:
Step 1: Run the program and choose "Reset Device" option at the bottem right of the main interface.

Step 2: Then you'll see a new screen, Select "Factory Reset" and click on the "Factory Reset" button to enter the firmware download page.

Step 3: Now you'll need to download the matched firmware package for you before resetting. You are also allowed to import the firmware package manually.

Step 4: Once the firmware package is downloaded, you can start resetting your device. When the process completes, set up your iPhone as new.

General Reset iPhone/iPada/iPod
General Reset feature will help you return iPhone/iPad/iPod settings to their defaults and resolve some minor glitches, like network not working, notification not working etc.
Step 1: Select "General Reset" and click on the "General Reset" button to enter the firmware download page.

Step 2: Follow the on-screen instructions to reset your device according to your needs.

3.4 Downgrade iOS/iPadOS
UltFone iOS System Repair provides downgrading iOS system mode, while it will erase all data on your device. Thus, it’s important to back up data before using downgrade features.
This guide mainly introduce how to downgrade from iOS 16 beta with Downgrade mode. You need to download and install UltFone iOS System Repair on your computer first, then follow the steps below.
Step 1. Connect iPhone to Computer
Run UltFone iOS System Repair on your computer and connect iPhone to computer. Once the device is connected, click “iOS Upgrade/Downgrade” at the bottom left of the panel.

Step 2. Choose Downgrading System Option
Since it is a beta version, you should choose Downgrading System mode. Then, click the button below.

- Downgrading System supports to downgrade between the major version, including iOS beta downgrade. For example, downgrade iOS 16 to iOS 15.5.
Step 3. Download Firmware Package
UltFone iOS System Repair will detect your iOS version automatically and display the downgradable iOS firmware. Click “Download” to get the package.

- · If you failed to download the firmware, just hit the ‘click here’ to download it through browser.
- · If you've already have a firmware on computer, just click "import local file" to import the firmware manually.
It may take a few minutes to download the firmware.

- Unsigned IPSWs cannot currently be restored via UltFone iOS System Repair. If the iOS version is not supported to downgrade, the program will prompt that no downgradable iOS firmware found.
Note:

You can visit the IPSW website to check which firmware Apple is signing.
Step 4. Initiating Downgrade
Once the firmware package is downloaded on your computer, you can click 'Initiating Downgrade' to downgrade iOS/iPadOS.

iOS Downgrade will cause all data and settings loss, please make sure that you have made a backup before. If confirmed, then click “Continue” button.

Step 5. Downgrading
The program starts to downgrade iOS/iPadOS, please do not disconnect your device during the downgrade process.

When the downgrade is completed, you will see the completed page and your iPhone/iPad will go back to the previous version.

3.5 Fix macOS system
Standard Repair: Fix macOS Stuck Issues without Data Loss
Step 1: Download and Install UltFone iOS System Repair on Normal Mac
Run UltFone iOS System Repair on your normal mac computer and connect it to the computer that needs to be repaired. Once the device is recognized, click 'Repair macOS system issues' button to use macOS System Recovery tool.
- Note:
- To repair macOS system successfully, it's highly recommended that you connect the the two macOS device using the Apple original lightning USB cable.
Step 2: Click 'Standard Repair' to Proceed
In the below interface, select 'Standard Repair' and read the note below to avoid repairing process failure. If you're ready, click 'Standard Repair'.
Step 3: Enter into DFU Mode
Select the model of the mac computer you need to be repaired and follow the instructions on the screen.
- Note:
- If your device can't be detected, please make sure that the model you have selected corresponds to your device model, and follow the instructions to put your computer into DFU mode.
Step 4: Download Firmware Package
If you're ready, click 'Download' to download the latest firmware package. It will take some time due to about 12GB firmware package.
If you failed to download the firmware package, you can download it through browser by hit 'click here'.
If you've already downloaded the firmware package on computer, just click "import local file" to import the firmware manually.
Step 5: Start Standard Repair
Once the firmware package is downloaded on your computer, you can click 'Start Standard Repair' to start system recovery.
The whole repair process will take a few minutes, please wait patiently.
After the repair is done, your macOS device will automatically reboot and all your data will not be erased.
- If your Mac models is with the Apple T2, before repairing done, you should follow the instructions below steb by step:
- After you finished all the steps, please click the "Done" button and your Mac with Apple T2 will be repaired successfully without data loss.
Note:
Deep Repair: Fix macOS System Issues with a Higher Success Rate
Deep Repair can fix more serious macOS system issues with a higher success rate but it will cause data loss. So when Standard Repair fails repair, you can take Deep Repair for a try.
Step 1: Download and Install UltFone iOS System Repair
Download and run UltFone iOS System Repair, connect your two Mac devices via a USB cable.
Step 2: Click "Deep Repair"
In the following interface, select "Deep Repair" and read the note below carefully. If there"s no problem, please click "Deep Repair".
Step 3: Enter into DFU Mode
Select the model of the mac computer you need to be repaired and follow the instructions on the screen.
- Note:
- If your device can"t be detected, please make sure that the model you have selected corresponds to your device model, and follow the instructions to put your computer into DFU mode.
Step 4: Download Firmware Package
Now, you can start downloading firmware package by pressing "Download" button and it will take a few minutes.
Step 5: Start Deep Repair
Now, the firmware package has been downloaded, click "Start Deep Repair" to start repairing.
Deep Repair will cause all data and settings loss. If the device can operate, you can back up data first and then try again. If not, just click "Repair" to proceed.
After a while, your device will be repaired successfully, just to check if your device goes back to normal.
- Note:
- If your Mac models is with the Apple T2, before repairing done, you should follow the instructions below steb by step:
- After you finished all the steps, please click the Done button and your Mac with Apple T2 will be repaired successfully.
3.6 Downgrade macOS
If you want to revert your Mac to a previous version due to compatibility issues, UltFone iOS System Repair is the best bet for you. It provides a hassle-free solution that saves time and effort. With just a few clicks, you can downgrade your macOS version, and UltFone iOS System Repair will handle the rest.
This guide mainly introduce how to downgrade your Mac devices. You need to download and install the UltFone iOS System Repair on your computer first, then follow the steps below.
Step 1. Connect Both Mac Devices
Run UltFone iOS System Repair on your computer and connect both Mac devices. Once the devices are connected, click “More Features” at the bottom left of the panel.
Step 2. Choose Downgrading System Option
No matter beta version or final version, you should choose Downgrading System mode. Then, click the button below.
Step 3. Enter into DFU Mode
Follow the instructions below to put your mac into DFU mode. The methods are different from models, please make sure you choose the right model.
Step 4. Download Firmware Package
UltFone iOS System Repair will detect your macOS version automatically and display the downgradable macOS firmware. Click “Download” to get the package.
· If you failed to download the firmware, just hit the ‘click here’ to download it through browser.
· If you've already have a firmware on computer, just click import local file to import the firmware manually.
It may take a few minutes to download the firmware.
- Note:
- Unsigned IPSWs cannot currently be restored via UltFone iOS System Repair. If the macOS version is not supported to downgrade, the program will prompt that no downgradable macOS firmware found.
Step 5. Initiating Downgrade
Once the firmware package is downloaded on your computer, you can click 'Initiating Downgrade' to downgrade macOS.
Initiating Downgrade will cause all data and settings loss, please make sure that you have made a backup before. If confirmed, then click “Continue” button.
Step 6. Downgrading
The program starts to downgrade macOS, please do not disconnect your device during the downgrade process.
When the downgrade is completed, you will see the completed page and your two mac devices will go back to the previous version.
3.7 Upgrade macOS
Whether you want to update to the latest macOS version or revert to a previous version due to compatibility issues, UltFone iOS System Repair provides a hassle-free solution that saves time and effort. With just a few clicks, you can upgrade your macOS version, and UltFone iOS System Repair will handle the rest.
This guide mainly introduce how to update your Mac devices. You need to download and install the UltFone iOS System Repair on your computer first, then follow the steps below.
With UltFone iOS System Repair, you can be sure that your Mac will be updated to the latest version with ease and without any risk of data loss or damage to your system. Here is how to update your macOS Update macOS without a hitch.
Step 1. Connect Both Mac Devices
Run UltFone iOS System Repair on your computer and connect both mac devices. Once the devices are connected, click “More Features” at the bottom left of the panel.
Step 2. Choose Upgrading System Option
No matter beta version or final version, you should choose "Upgrading System" mode. Then, click the button below.
Step 3. Enter into DFU Mode
Follow the instructions below to put your mac into DFU mode. The methods are different from models, please make sure you choose the right model.
Step 4. Download Firmware Package
UltFone iOS System Repair will detect your macOS version automatically and display the upgradable macOS firmware. Click “Download” to get the package.
· If you failed to download the firmware, just hit the ‘click here’ to download it through browser.
· If you've already have a firmware on computer, just click "import local file" to import the firmware manually.
It may take a few minutes to download the firmware.
- Note:
- Unsigned IPSWs cannot currently be restored via UltFone iOS System Repair. If the macOS version is not supported to upgrade, the program will prompt that no upgradable macOS firmware found.
Step 5. Initiating Upgrade
Once the firmware package is downloaded on your computer, you can click 'Initiating Upgrade' to update macOS.
Initiating Upgrade will not clear your data. If confirmed, then click “Continue” button.
Step 6. Upgrading
The program starts to update macOS, please do not disconnect your device during the upgrade process.
When the upgrade is completed, you will see the completed page and your Mac devices will be the newest version.
- Note:
- If your Mac models is with the Apple T2, before repairing done, you should follow the instructions below steb by step:
- After you finished all the steps, please click the "Done" button and your Mac with Apple T2 will be upgraded successfully.
Part 4: Guide for UltFone Toolkit - WhatsApp Transfer
UltFone WhatsApp Transfer enables you to transfer WhatsApp from iPhone to Android, Android to iPhone, iPhone to iPhone and also supports to transfer WhatsApp from Android to Android. Meanwhile, during this process, you'll automatically achieve to backup and restore WhatsApp/Viber/WeChat/Kik.
Download this WhatsApp manager tool and get to know how to use it.
- 4.1 How to Transfer WhatsApp from iPhone to iPhone
- 4.2 How to Transfer WhatsApp from iPhone to Android
- 4.3 How to Transfer WhatsApp from Android to iPhone
- 4.4 How to Transfer WhatsApp From Android To Android
- 4.5 How to Download WhatsApp Backup From Google Drive
- 4.6 How to Restore/Transfer WhatsApp Backup From Google Drive to iPhone/Android
4.1 How to Transfer WhatsApp from iPhone to iPhone
This WhatsApp Transfer tool supports to transfer WhatsApp to new phone directly, you don't need to backup whatsapp first. This part will show you how to transfer WhatsApp from iPhone to iPhone/iPad.
Step 1: Launch UltFone for WhatsApp Transfer and connect both the source and target device to computer. You can see the device name to confirm you correctly select the source iPhone and target iPhone. Click Transfer button to continue.

Note: If your device connected but not recognized, please check and unlock your device to trust this computer.
Step 2: Prior transfer, please make sure that all previous WhatsApp data in the target device will be replaced with new WhatsApp data after transfer. Click Yes to continue if you confirm this.

Step 3: In the next screen, this program will back up WhatsApp data on the source device. So in case anything unexpected happens, you should not worry your WhatsApp data be lost.

Step 4: Before proceeding to transfer after the backup is completed, please make sure that you've logged in to WhatsApp on the target iPhone. Otherwise, the transferred data is invisible even if the transfer is successful.If you already logged in to WhatsApp, just click Logged in to continue.

Note: If you turned on Find My iPhone, please follow the instructions to turn off Find My iPhone before tranferring.

Step 5: Everything is done, the WhatsApp Transfer starts. It is a process to restore the previous backed up data to the target iPhone. The time it takes largely depends on the size of your WhatsApp data.

Step 6: Now, all your WhatsApp data are transferred successfully to the new phone.

4.2 How to Transfer WhatsApp from iPhone to Android
Someone will change iPhone to Android for new experience. So, you will need to transfer WhatsApp messages from iPhone to Android to keep history. This part will show you how to transfer WhatsApp messages from iPhone to Android, please follow these steps to make WhatsApp transfer.
Step 1: Launch this program and choose "WhatsApp Transfer" from the main menu. Connect the source iPhone and target Android phone to computer. Click Transfer button.

Notes:
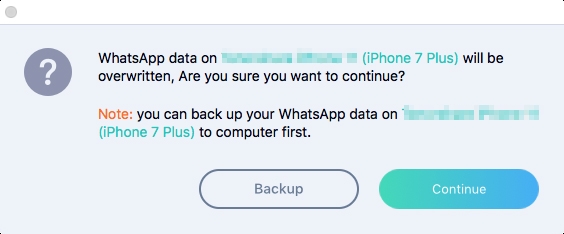
- The WhatsApp data in the Android phone will be overwritten. If you sure you want to continue, please select Yes to confirm this action.

Step 2. Prior to transfer, this WhatsApp transfer tool will backup WhatsApp data in the source iPhone.

Step 3. After the backup is completed, you need to verify the WhatsApp account that you are going to log in to the target Android device. To do that by entering your country code and phone number and click Verify button.

Step 4. Enter the verification code that you received on the target device. Please enter the code on the horizontal line, and click Verify. If you don't get the code, just click Resend Code or Call Me to try again. Remember that there are 3 times limitations on obtaining verification codes a day

Step 5. After WhatsApp verification, this program will generate data that can be transferred to the target device. Before the transfer, you are allowed to select types of WhatsApp data.


Step 6: It will start to transfer WhatsApp messages to Android after data has been generated., please do not disconnect the device, otherwise you will lose the WhatsApp data.

Step 7: Transferring WhatsApp data, wait patiently. After WhatsApp transferred to Android successfully, please follow the onscreen instructions to restore data to the target device.

4.3 How to Transfer WhatsApp from Android to iPhone
Nowadays, many Android users can't take their eyes out of the promise land of iPhone and bought a ticket to join the Apple club, however, it's often an unnerving to say goodbye to your WhatsApp data when you switch to a new phone. In this post, I will tell you how to transfer WhatsApp from Android to iPhone.
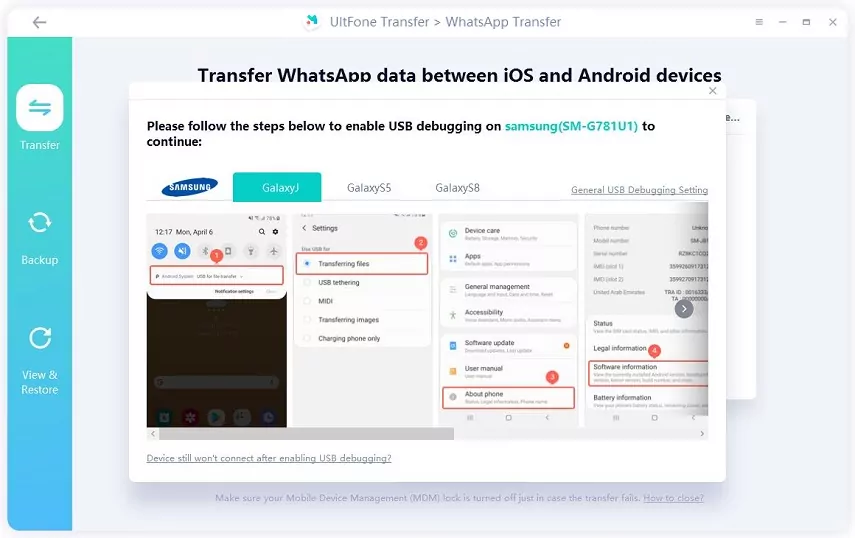
Step 1: Download and install this software on your computer and launch this application. Connect the source device (Android) and target device (iPhone) to computer via USB cable.

Note:
-
If the Android device connected but not recognized, please follow the onscreen instructions to enable USB debugging.
-
The existing WhatsApp data in the target iOS device will be overwritten by new data after transfer.
Step 2. Before transfer, please follow the onscreen instructions to create a new backup of WhatsApp data in your source device.If you've done, click Continue to proceed.

Step 3. In the next step, please wait for the program to obtain WhatsApp data from the source device.

Step 4. For data security, you must verify the WhatsApp account you used when creating the backup before proceeding. Just enter your country code and phone number to receive a verification code.

Confirm your phone number and click Continue to start verification.

Note: The WhatsApp account on your source device may be logged out during the verification process. In order to verify successfully, please do not log in again.
Step 5. Enter the verification code and click Verify.


Step 6. Once verification is succcessfully, you need to choose what types of data you in WhatsApp you want to transfer. After this, the UltFone program will automatically enter the next step to generate data for transfer.


Step 7. Please log in to WhatsApp on the target device before transfer, otherwise the restored data will invisible.

Step 8. This program will start transferring WhatsApp messages from Android to iPhone.

Note: If Find My iPhone is turned on in your iOS device, please follow the onscreen steps to turn off Find My iPhone to continue.
Step 9. That's It. Now you successfully transfer WhatsApp messages from Android to iPhone.

4.4 How to Transfer WhatsApp From Android To Android
If you're an Android user attempting to buy a new Android device with better performance, you may be concerned about how to transfer WhatsApp messages from Android to Android and make sure nothing is lost during this process. Here, you are landing on the right page, I will tell you how to transfer WhatsApp data from Android to Android.
Step 1: Run this software after downloading and installing. Connect both source and target Android devices to computer via USB cable. Click Transfer.

Note: The current data in the target Android phone will be overwritten after transfer.
Step 2. Prior to transfer, we highly recommend you to create a new backup of WhatsApp data in the source device. Please follow the steps on the screen and click Continue after backup.
Step 3. This program will start getting the data that you just backed up.

Step 4. Prior to the transfer process, you are allowed to select the types of WhatsApp data to transfer and those you don't select won't be transferred. After the selection, click the "Continue" button to move to the next step.

Step 5. Now, the software will transfer WhatsApp data from Android to Android, please do not discontinue either devices until the process ends. And how long this takes will hinge on how large the file is and how quickly the network can transmit the data.

Step 6: When you come to this step, it means the transfer is almost complete. You just need to do a few more steps to see the transferred WhatsApp data in the targeted device. Please follow the onscreen instructions correctly.

4.5 How to Download WhatsApp Backup From Google Drive
Step 1: Connect your phone to your computer with a data cable. Click the “Backup” icon on the left sidebar. Then you will see two ways to backup WhatsApp data. Select the “From Google Drive” option on the top menu. Confirm your device and then tap on the “Back Up Now” button.

Step 2: Please backup the WhatsApp data on your Android phone before sign-in. Then, enter your account and password to sign in to your Google Drive.

Step 3: Select one of the WhatsApp backup history listed on the next screen. Then hit on the “Continue” button.

Then, UltFone will start to download your WhatsApp backup data. The waiting time depends on the size of the backup file, so please be patient and make sure the internet connection is stable during the process.

Step 4: After downloading, enter the country code and phone number you used to backup data to verify your WhatsApp account.

Step 5: When the WhatsApp account verification is finished, the program will automatically move to the next process: generating WhatsApp data. During the generation, your WhatsApp account on the source phone will be logged out.

Now, the WhatsApp data is backed up on the computer. You can view and download it on your computer or transfer it to your iPhone/Android.

4.6 How to Restore/Transfer WhatsApp Backup From Google Drive to iPhone/Android
Step 1: Click the “View Backup” button after backup. The detailed WhatsApp data will be shown to you and you are allowed to view different data types by simply clicking the data icon on the left sidebar.

Step 2: Click on the “Restore to iOS” button to restore WhatsApp backup data to your iPhone. If you want to restore data to an Android phone, then tap on the “Restore to Android” option. Confirm your device info and tap on the “Restore Now” button on the next screen.

Step 3: The UltFone program will begin to generate WhatsApp data. Please do not disconnect your device during the restoration.

Step 4: Next, log into your WhatsApp account on the target device. Don’t forget to skip the “Restore from iCloud” choice. Then, click the “Logged in” button on the screen.

Step 5: Lastly, it starts to restore the WhatsApp backup data from Google Drive to your iPhone. The process will take a while, and please be patient.

After restoring, go to your iPhone to check the WhatsApp data.

Part 5: Guide for UltFone Toolkit - iOS Activation Unlock
UltFone Activation Unlock is professionally designed to Bypass iCloud activation lock without password on iPhone/iPad/iPod touch. If you forgot your Apple ID account or password, or you purchased a second-hand iPhone with iCloud activation lock enabled, this program aims to help you out of the trouble.
You can download the program free on both Windows and Mac computers. Here is the step by step guide to bypass iCloud activation lock.
- 5.1 How to Bypass iCloud Activation Lock on iPhone/iPad/iPod touch
- 5.2 How to Turn Off Find My on iPhone/iPad/iPod Touch
- 5.3 How to Unlock Apple ID without Password
- 5.4 How to Turn Off Camera Sound on iPhone/iPad/iPod touch
5.1 How to Bypass iCloud Activation Lock on iPhone/iPad/iPod touch
- Step 1. Launch UltFone Activation Unlock.
- Step 2. Jailbreak Your iDevice.
- Step 3. Bypass iCloud Activation Lock.
Step 1. Launch UltFone Activation Unlock.
1. Launch UltFone Activation Unlock on a computer and click Start to bypass to start.

2. Read the agreement carefully and click Next to proceed.

3. Connect your device to the computer via a USB cable.

Step 2. Jailbreak Your iDevice.
How to Jailbreak If You're Using Mac.
1. Once your device gets recognized, UltFone Activation Unlock will start downloading the jailbreak tool.

2. When the jailbreak tool is downloaded successfully, click Start Jailbreak to proceed.

3. Follow the on-screen instructions to jailbreak your device. Once the jailbreak succeeds, click Next to enter the next interface.

4. Now, the program will display the device info, please confirm it and click Start Bypass to start removing the iCloud activation lock.

How to Jailbreak If You're Using Windows.
Same as the Mac version, once you connect your device to the computer, Windows UltFone Activation Unlock will automatically download the jailbreak tool. What's different is that you have to perform the jailbreak manually. Here's what you need to do:
1. After downloading the jailbreak tool, you should burn the jailbreak environment to a blank USB flash drive.
![]()
2. Click on the Start button and confirm your deision in the pop-up window.
![]()
3. Wait patiently for UltFone Activation Unlock to install the jailbreak tool to the USB flash drive.
![]()
4. Once finished, follow the on-screen instructions to jailbreak your device step by step.
![]()
![]()
![]()
Step 3. Bypass iCloud Activation Lock.
1. The process to bypass iCloud activation lock won’t take much time. Please wait patiently for it to complete.

2. Congratulations! You've successfully bypassed iCloud activation lock from yoru device. Now you can log in to a new Apple ID through App Store or iTunes & App Stores in Settings to download apps over Wi-Fi.

5.2 How to Turn Off Find My on iPhone/iPad/iPod Touch
Find My is a feature that can help Apple users to locate their lost devices and remotely erased their device data to avoid the possible privacy leakage. However, when you want to sign out your Appld ID on your device, you'll be required to turn off Find My first. In case you forgot your Appld ID/password, or bought a second-hand device with Find My enabled, UltFone Activation Unlock worked out a way to turn off Find My without Apple ID and password. Here's how it works:
- Step 1. Connect Your iDevice to a Computer.
- Step 2. Start to Turn Off Find My.
- Step 3. Successfully Turn Off Find My.
Step 1. Connect Your iDevice to a Computer.
1. Launch UltFone Activation Unlock on your computer, then select Turn Off Find My iPhone from the main interface.
![]()
2. Connect your iDevice to the computer with a USB cable.
![]()
3. Trust the computer on your iDevice.
![]()
Step 2. Start to Turn Off Find My.
For iOS 11.4 and above:
1. Click Next to proceed.
![]()
2. Follow the on-screen instructions to configure your iDevice.
![]()
3. Now the program will start removing Find My from your device.
![]()
4. Check Find My status on your device.
![]()
- Note:
- If the Find My status is still on, please try again untill it's successfully turned off.
- Please continue to bypass the Apple ID, otherwise your iDevice will get stuck on the activation lock screen.
For iOS versions below iOS 11.4:
- Note:
- If your device is running iOS 10.2-11.3, no data will be lost after turning off Find My.
- If your device is running a version of iOS older than iOS 10.2, all your data will be wiped out after turning off Find My.
1. Likewise, click Next to proceed.
![]()
2. Manually reset all settings on your iDevice.
![]()
Step 3. Successfully Turn Off Find My.
1. Wait for a while to bypass Apple ID.
![]()
2. Congratulations! Now you've successfully turned off Find My and bypassed Apple ID.
![]()
5.3 How to Unlock Apple ID without Password
This feature can enable you to sign out of Apple ID, reset your device to factory settings, and turn off Find My [Device] when you forgot your Apple ID and password or your Apple ID has been locked for security reasons.
Here's how to unlock Apple ID on iPhone/iPad/iPod Touch without password:
- Step 1. Connect Your iDevice to a Computer.
- Step 2. Start to Unlock Apple ID.
- Step 3. Successfully Unlock Apple ID.
Step 1. Connect Your iDevice to a Computer.
1. Launch UltFone Activation Unlock on your computer, then select Unlock Apple ID from the main interface.
![]()
2. Connect your iDevice to the computer via a USB cable.
![]()
3. Trust the computer on your iDevice.
![]()
Step 2. Start to Unlock Apple ID.
This step will be slightly different depending on the status of Find My [Device].
- Case 1: How to Bypass Apple ID if Find My Feature is On.
- Case 2: How to Bypass Apple ID if Find My Feature in Off.
Case 1: How to Bypass Apple ID if Find My Feature is On
For iOS 11.4 and above:
1. Click Next to proceed.
![]()
2. Follow the on-screen instructions to configure your iDevice.
![]()
3. Start to bypass Find My feature.
![]()
4. Check your iCloud status.
![]()
For iOS versions below iOS 11.4:
- Note:
- If your device is running iOS 10.2-11.3, no data will be lost after unlocking Apple ID.
- If your device is running a version of iOS older than iOS 10.2, all your data will be wiped out after unlocking Apple ID.
1. Still, click Next to proceed.
![]()
2. Manually reset all settings on your iDevice.
![]()
Case 2: How to Bypass Apple ID when Find My Feature in Off
If the Find My feature is previously off on your iDevice, then UltFone Activation Unlock will directly start to bypass Apple ID.
![]()
- Note:
- If your device is running iOS 10.2 or above, no data will be lost after unlocking Apple ID.
- If your device is running a version of iOS older than iOS 10.2, all your data will be wiped out after unlocking Apple ID.
Step 3. Successfully Unlock Apple ID.
With all previous preparations being completed, you can now move on to unlock Apple ID.
![]()
![]()
5.4 How to Turn Off Camera Sound on iPhone/iPad/iPod touch
- Step 1. Connect Your iDevice to a Computer.
- Step 2. Jailbreak Your Device.
- Step 3. Turn Off Camera Sound.
Step 1. Connect Your iDevice to a Computer.
1. Launch UltFone Activation Unlock on a computer and click Turn Off Camera Sound at the bottom right corner.

2. Read the cautions carefully and click Next to proceed.

3. Connect your device to the computer via a USB cable.
Step 2. Jailbreak Your iDevice.
1. After letting UltFone Activation Unlock download the jailbreak tool, burn the jailbreak environment to a blank USB flash drive.
![]()
2. Click on the Start button and confirm your deision in the pop-up window.
![]()
3. Wait patiently for UltFone Activation Unlock to install the jailbreak tool to the USB flash drive.
![]()
4. Once finished, follow the on-screen instructions to jailbreak your device step by step.
![]()
![]()
![]()
Step 3. Turn Off Camera Sound.
1. Confirm your device info and click Start to Turn Off.

2. The whole process will take 1-2 minutes, please wait patiently.

3. Congratulations!Now the shutter sound on your iPhone/iPad/iPod touch has been successfully turned off.
